Appearance
Last review: Sept 15,2025
--- INTRODUCTION ---
Basically, a driver is code that runs at the kernel level. In this section, I will provide a minimal driver example and explain how to build it on both Windows and Linux systems.
The following instructions were tested on:
- Windows 11 24H2
- Linux kernel 6.16.4-arch1-1 (built for the Arch Linux distribution)
--- WINDOWS ---
Windows offers multiple ways to build a kernel driver. As far as I know, there are three main approaches:
- WDM (Windows Driver Model), the legacy model
- KMDF (Kernel-Mode Driver Framework), which includes a small layer of code abstraction. This is the one we will use.
- UMDF (User-Mode Driver Framework). Drivers built with UMDF are out of scope for this article because they run in user space and offer less control.
A Note on Security
For security reasons, Windows requires drivers to be signed; otherwise, loading a driver will fail. To load the driver we are going to build, it is necessary to disable this protection. This can be done using the following simple command:
bcdedit /set testsigning onNote that this command will only work when Secure Boot is disabled.
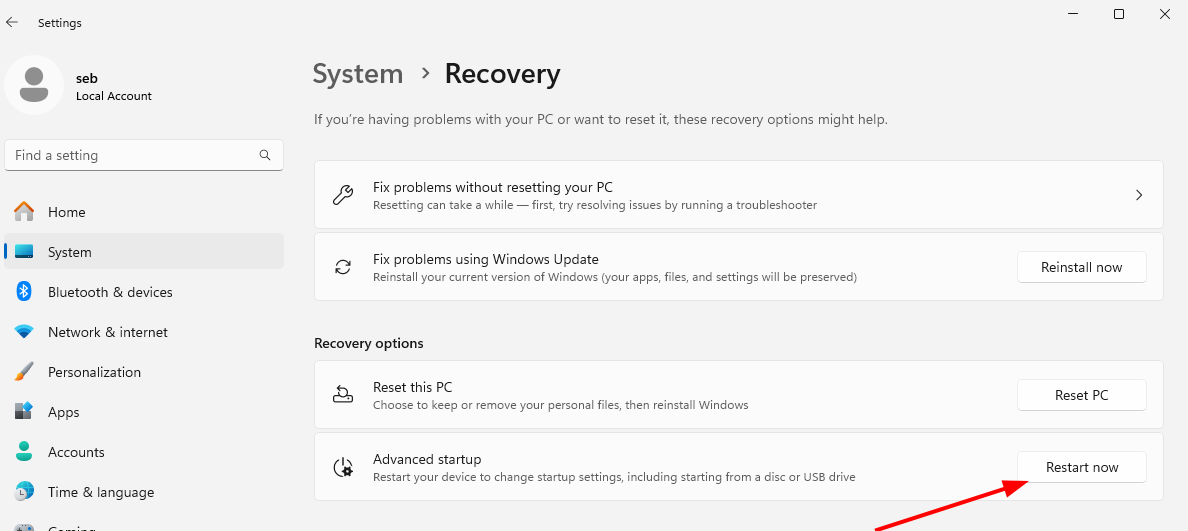
A complete restart is required, which can be done using the shutdown command or:
I have heard that it is possible to make Windows check driver signatures against custom certificate authorities, but I have not investigated this further.
Debugging
Moreover, the Windows kernel can provide debugging messages that may be valuable. To access them, it is necessary to enable this feature using the following command:
bcdedit /debug onAlso, you can select the types of messages to receive by configuring a registry key:
HKLM\SYSTEM\CurrentControlSet\Control\Session Manage\Debug Print Filter`.Setting this key to 0xFFFFFFFF will enable all debug messages.
STOP HERE
Loading a driver
Before we get our hands dirty, let’s take a brief tour of how the kernel becomes aware of our driver.
Basically, a driver is a .sys file that follows the Portable Executable (PE) format.
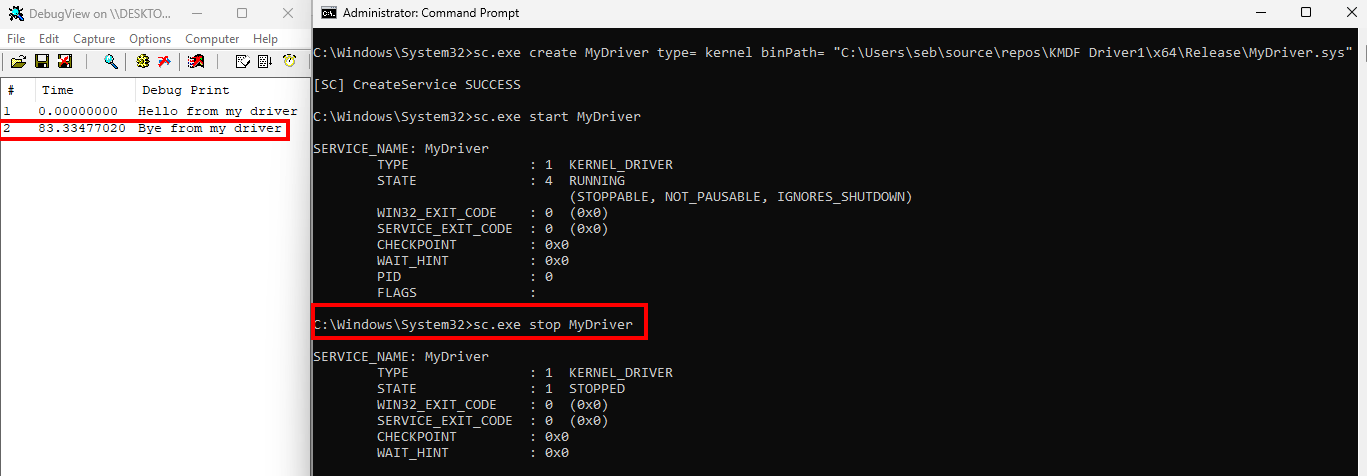
It is loaded through a Windows service. Thus, you need to create a service and start it. This can be done using the sc.exe command. For example:
sc.exe create MyDriver type= kernel binPath= "C:\Users\seb\source\repos\KMDF Driver1\x64\Release\MyDriver.sys"
sc.exe start MyDriver
(In general, note that it is preferable to avoid spaces in the path.)
By starting the service, sc.exe will load our driver into memory and ultimately execute a function called DriverEntry().
Similarly, sc.exe can be used to unload a driver and, if desired, remove the associated service:
sc.exe stop MyDriver
sc.exe delete MyDriver
During the unloading process, another function of our driver is called.
Minimal code
Here comes the most interesting part: a minimal KMDF driver code!
From the previous section, you have probably understood that the minimal code for a driver consists of implementing the DriverEntry() function:
c
NTSTATUS DriverEntry(
  _In_ PDRIVER_OBJECT  DriverObject,
  _In_ PUNICODE_STRING RegistryPath
);
Entry Point
The DriverEntry() function is the first function called in our driver.
Through this function, we can inform the kernel that our driver has been successfully loaded by returning STATUS_SUCCESS. Otherwise, STATUS_UNSUCCESSFUL should be returned.
This entry point function takes two parameters.
As explained by Microsoft:
DriverObject [in] A pointer to a DRIVER_OBJECT structure that represents the driver's WDM driver object.
RegistryPath [in] A pointer to a UNICODE_STRING structure that specifies the path to the driver's Parameters key in the registry.
c
typedef struct _DRIVER_OBJECT {
  CSHORT             Type;
  CSHORT             Size;
  PDEVICE_OBJECT     DeviceObject;
  ULONG              Flags;
  PVOID              DriverStart;
  ULONG              DriverSize;
  PVOID              DriverSection;
  PDRIVER_EXTENSION  DriverExtension;
  UNICODE_STRING     DriverName;
  PUNICODE_STRING    HardwareDatabase;
  PFAST_IO_DISPATCH  FastIoDispatch;
  PDRIVER_INITIALIZE DriverInit;
  PDRIVER_STARTIO    DriverStartIo;
  PDRIVER_UNLOAD     DriverUnload;
  PDRIVER_DISPATCH   MajorFunction[IRP_MJ_MAXIMUM_FUNCTION + 1];
} DRIVER_OBJECT, *PDRIVER_OBJECT;
In this structure, an immediately interesting field for us is DriverUnload.
The type of this field is a callback function. This field is used to register a function that will be called when the driver is unloaded:
C
VOID DriverUnload(
  [in] _DRIVER_OBJECT *DriverObject
);
Finally, we can define the following minimal code:
c
#include <ntddk.h>

VOID DriverUnload(_In_ PDRIVER_OBJECT DriverObject) {
    UNREFERENCED_PARAMETER(DriverObject);
    DbgPrintEx(DPFLTR_IHVDRIVER_ID, DPFLTR_INFO_LEVEL, "Bye from my driver\n");

}

NTSTATUS DriverEntry(_In_ PDRIVER_OBJECT DriverObject, _In_ PUNICODE_STRING RegistryPath) {
    UNREFERENCED_PARAMETER(RegistryPath);

    DbgPrintEx(DPFLTR_IHVDRIVER_ID, DPFLTR_INFO_LEVEL, "Hello from my driver\n");
    DriverObject->DriverUnload = DriverUnload;

    return STATUS_SUCCESS;
}
Note the use of the UNREFERENCED_PARAMETER macro, which tells the compiler that we intentionally do not use some parameters. This prevents compilation warnings that might otherwise be treated as errors.
Building
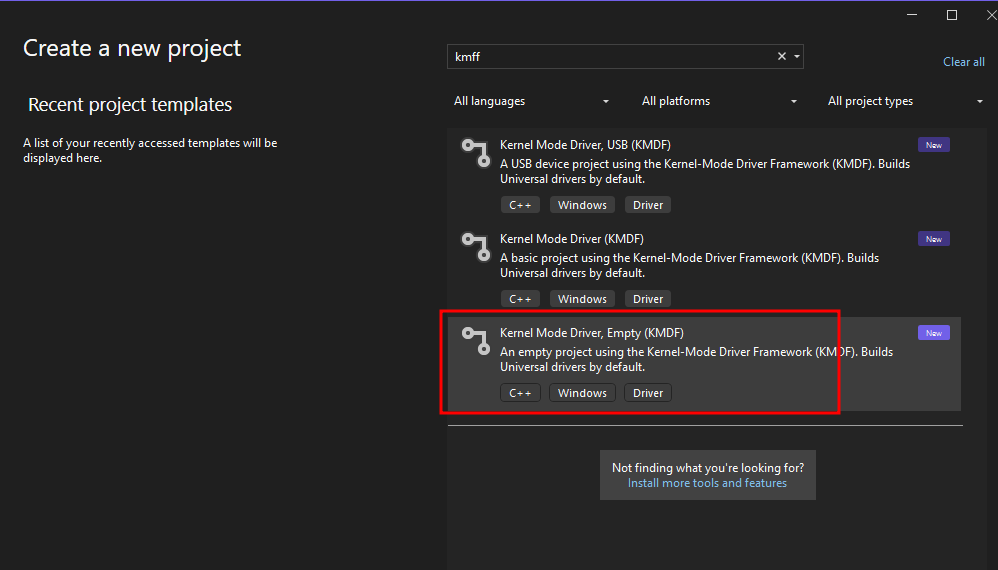
To build our driver, we first need to install some tools. First, install Visual Studio (not Visual Studio Code), which can be downloaded from the Microsoft website.
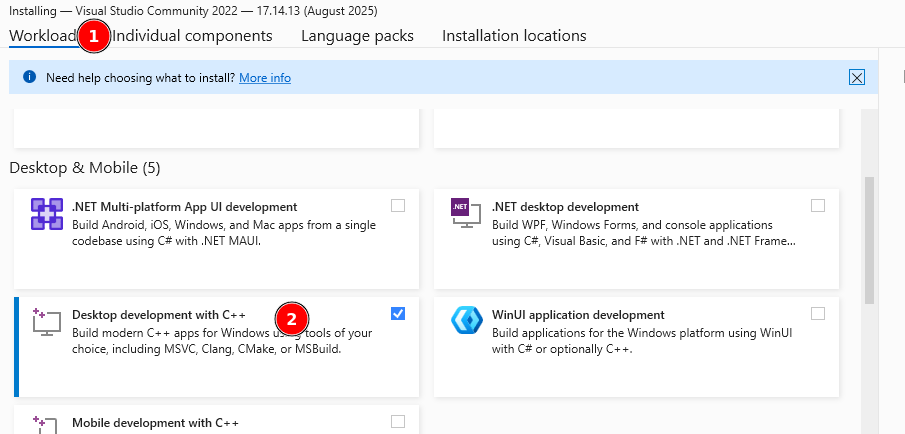
During installation, I typically select the Desktop development with C++ workload:
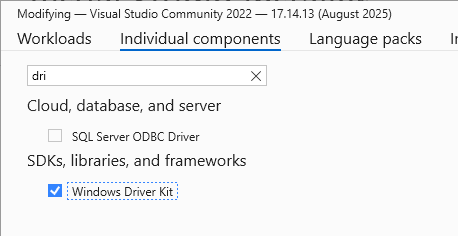
In Individual components, make sure to check Windows Driver Kit:
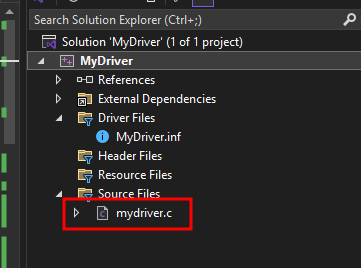
Note that, despite the tags showing only C++, Visual Studio also supports C. To determine whether a file should be compiled as C or C++, Visual Studio relies on the file extension.
It is important to ensure that the file containing our code has a .c extension. Otherwise, the name of our entry point, DriverEntry(), may be altered due to C++ name mangling:

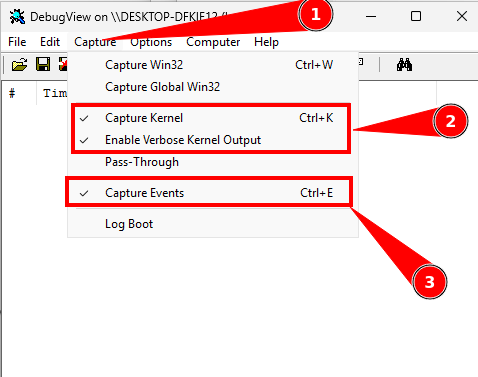
Before loading our driver, we need to get DebugView (a Sysinternals tool) and run it as Administrator to see the messages generated by DbgPrintEx().
Make sure to capture the correct events:
Next, we can load and unload our driver: 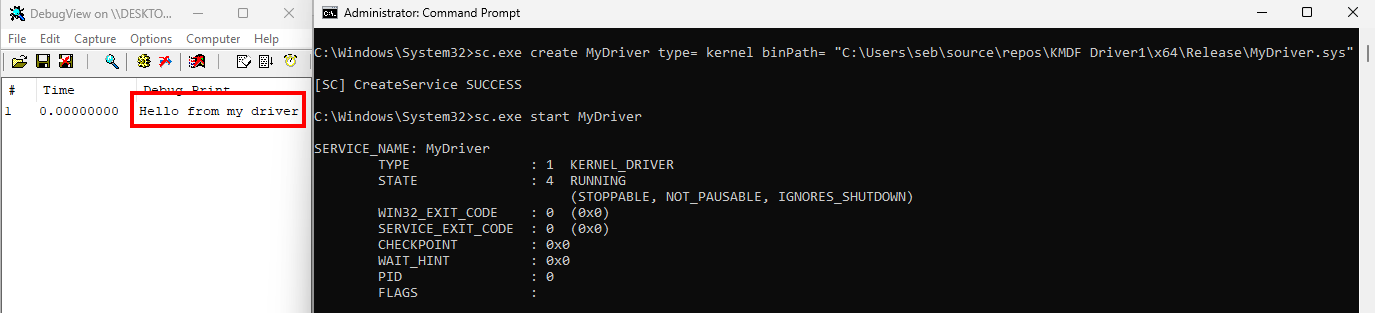
What's Next?
This blog post only explains how to build a minimal driver. What to do next is beyond the scope of this post, as it depends on your goals.
For example, you could create a virtual device using IoCreateDevice()/IoDeleteDevice(), or monitor process creation events like an EDR does using PsSetCreateProcessNotifyRoutineEx().
--- LINUX ---
The process of creating a driver in Linux is simpler than in Windows. In Linux terminology, a driver is often called a kernel module, has the extension .ko, and uses the ELF format.
Loading a Module
The process of loading a kernel module relies on the insmod or modprobe command. When insmod tries to load a kernel module, it searches for the address of a function in a special section. It is the compiler’s responsibility to store this address in that section, but we need to tell it which function to use. This is done with the help of the module_init macro.
A similar process is used for unloading a module.
Minimal Code
Entry Point
Essentially, implementing a Linux kernel module begins with defining an entry point function and specifying it to the compiler using the module_init macro:
c
#include <linux/module.h>

static int __init MyDriverEntry(void)
{
    printk(KERN_INFO "Hello, Kernel World!\n");
    return 0;
}

module_init(MyDriverEntry);
Compiling such code will result in an error because the compiler also needs information about the module, particularly its license and description. This can be provided using the MODULE_LICENSE and MODULE_DESCRIPTION macros.
Moreover, a kernel module also requires a function to call when the module is unloaded. Similar to loading, the address of this function must be stored in a special section. We simply need to tell the compiler the function’s address by using the module_exit macro.
Combining all of this, we get the minimal kernel module code:
c
#include <linux/module.h>

static int __init MyDriverEntry(void)
{
    printk(KERN_INFO "Hello, Kernel World!\n");
    return 0;
}

static void __exit MyDriverUnload(void)
{
    printk(KERN_INFO "Goodbye, Kernel World!\n");
}

module_init(MyDriverEntry);
module_exit(MyDriverUnload);


MODULE_LICENSE("GPL");
MODULE_DESCRIPTION("My own kernel module");
Building
To build a kernel module, you need to install the kernel headers and standard build tools (such as gcc, ld, etc.):
sudo pacman -Syu
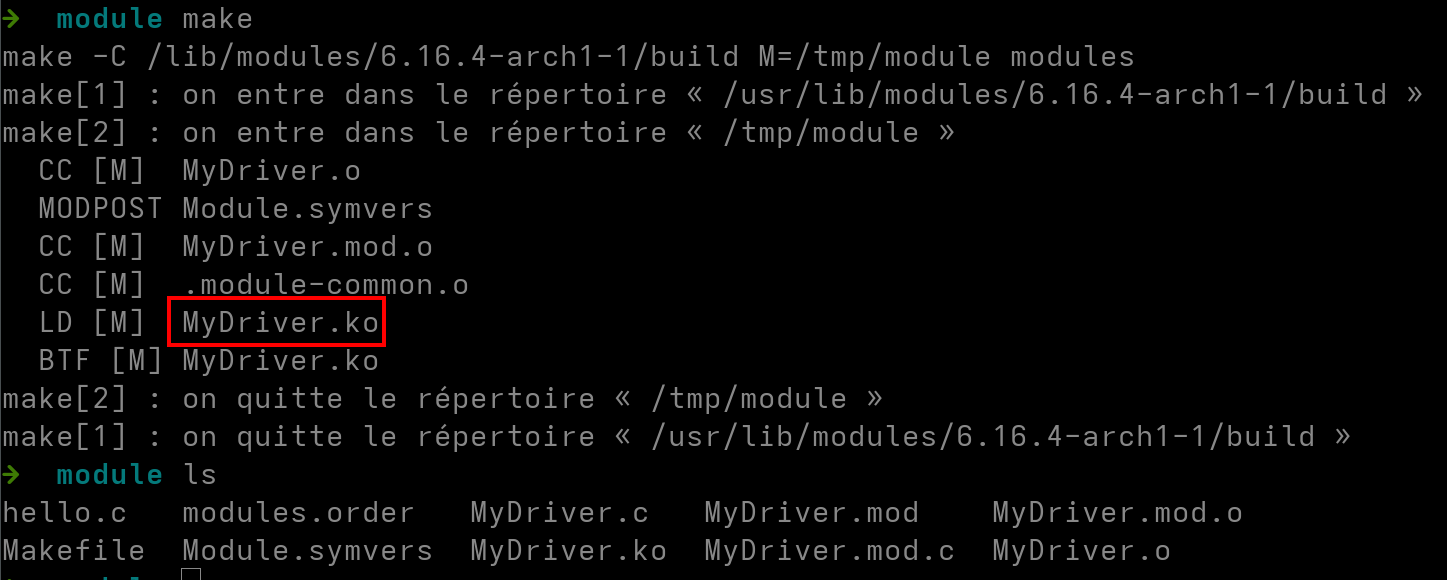
sudo pacman -S base-devel linux-headersA Makefile is then used to compile the module.
obj-m += MyDriver.o

all:
    make -C /lib/modules/$(shell uname -r)/build M=$(PWD) modules

clean:
    make -C /lib/modules/$(shell uname -r)/build M=$(PWD) clean